Thursday, August 8, 2013

Best Gluten Free Bread Ever!!


We have a gluten free bakery attached to our home where for the last couple of years we have been making gluten free buns (dinner, hamburger and hot dog) along with a few other products.  Bread was always the difficult one.  The dough that worked great for the buns would shrink in when made into a loaf.  I wanted a loaf that was like the whole wheat loaves I used to make.  After a bit of experimenting I have come up with a recipe that we feel is too good to keep to ourselves.  This recipe is very flexible and for me has worked out every time.  You are welcome to share this recipe but please give credit to our blog site.  Thanks!

Booy’s Gluten Free Bread Recipe- makes 2 full size loaves (pans are 8"x 4")

2 ¼ cup very hot tap water
1 teaspoon ground chia seed
1 tablespoon pysillium husk 
1 tablespoon sugar
½ cup or 1 cup cup flax meal (if you like it more like whole wheat bread use 1 cup flax meal - it will make a darker loaf that looks like a whole wheat loaf)
Let sit in large mixer bowl for 20 minutes.
Add to mixer bowl:
1 tablespoon yeast. 
Let sit 10 more minutes.
Meanwhile in another bowl mix together and set aside:
2 cups cornstarch
½ cup tapioca flour
¼ cup sweet rice flour
1 cup teff flour or buckwheat flour
1/3 cup sugar (or 1/4 corn or Rogers Syrup - if using syrup reduce 2 1/4 c water to 2 cups water)
2 teaspoons guar gum
1 ¼ teaspoon salt
Add a few cups of the dry flour  mixture  to the mixture in the mixing bowl. Then add:
3 large eggs
1 teaspoon vinegar
¼ cup canola oil
½ cup milk powder (or you can add cottage cheese or ¼ c whey powder instead)
Add remaining flour mixture.
Mix in mixer on med low speed for 15 minutes.
Scoop into two well greased loaf pans. I use the Fat Daddio's pan BP-5642.  The dough is like a heavy cake batter.  I run the tap with cold water and make my fingers wet to shape the loaves or buns.  You can make it fairly wet.
 Cover with a oiled piece of plastic placed loosely over the pans. Let rise until just above top of pan,
Bake at 350 for 50-60 minutes.  If it gets too brown reduce temperature but leave bread in at least 50 minutes otherwise they might sink.
For buns grease a baking sheet and scoop a “plop” of dough onto baking sheet and shape with wet fingers.  Bread tops are also shaped with a wet hand to give loaves a smooth top.
**chickpea can be substituted for part of the teff or buckwheat up to 1/2.
Bread Batter is scooped in loaf pans.


This is how it should look after you wet your fingers and shape it.

 loaves are made with less teff and 1/2 cup flax ,using chickpea flour and lighter flours to make more of a "white" loaf
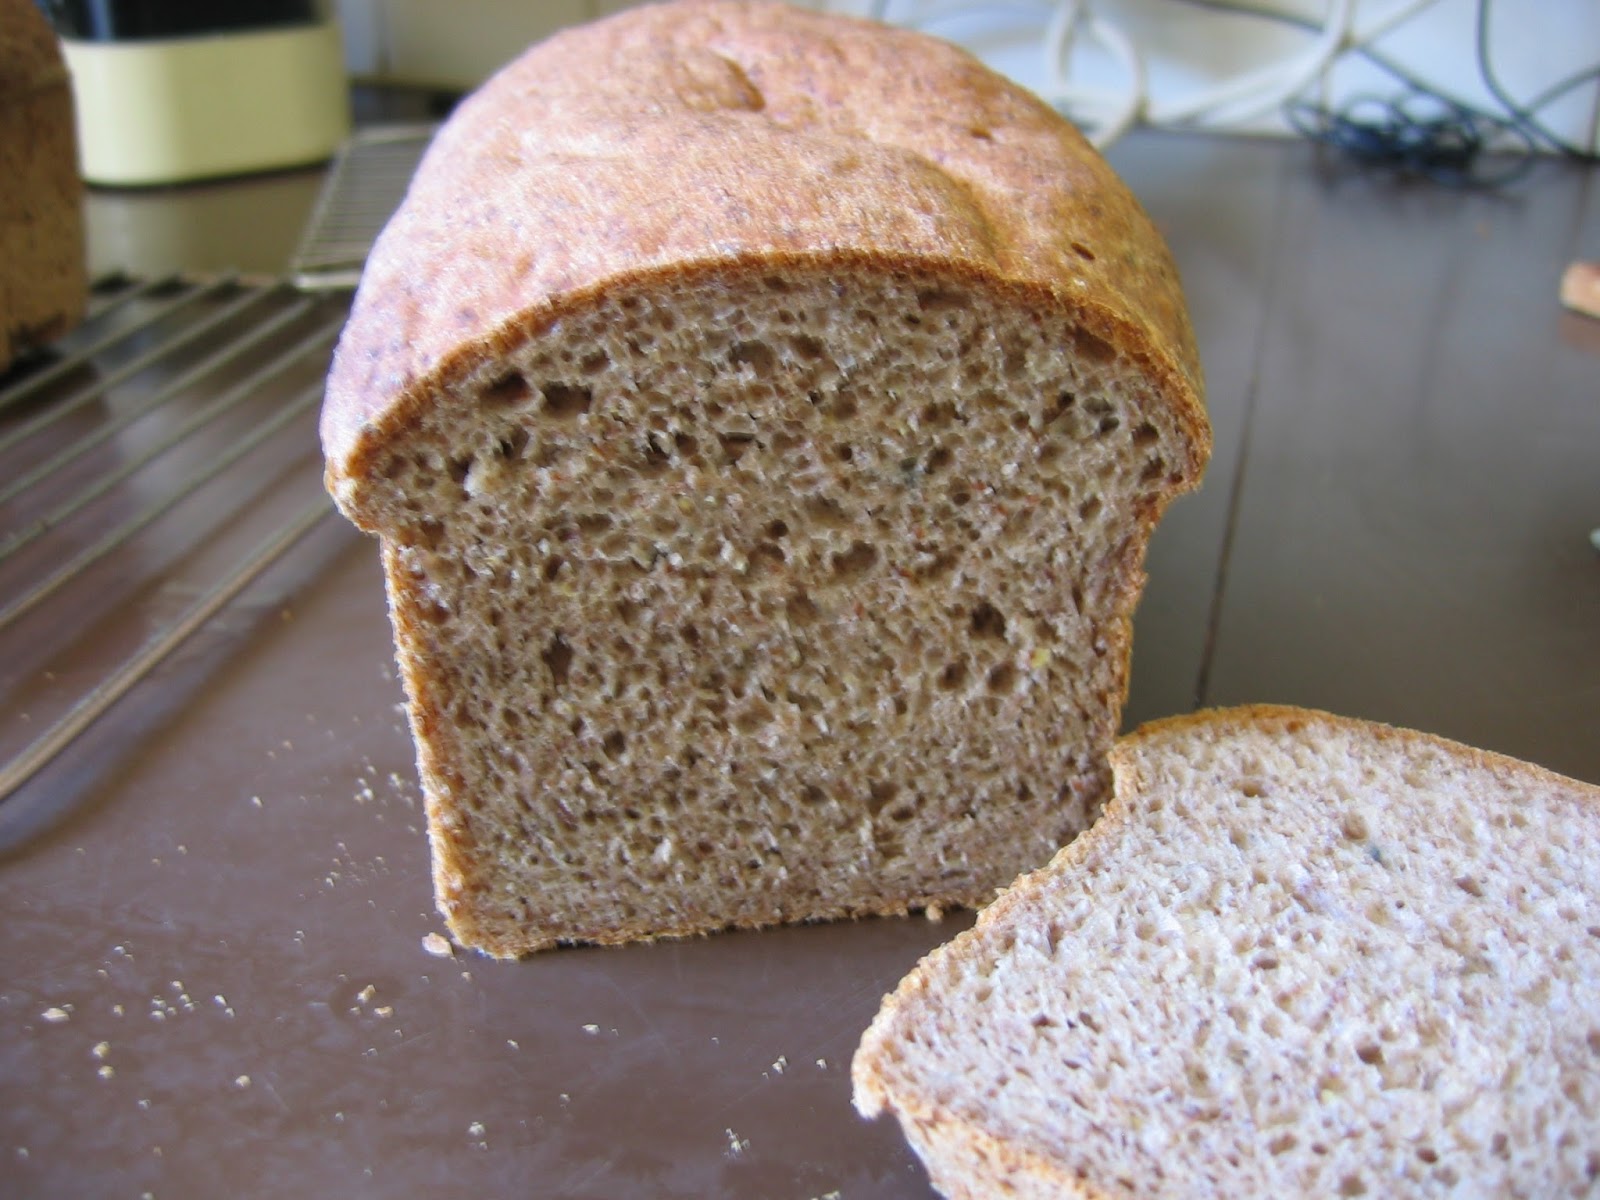
See the nice texture!  Makes a great sandwich and also toasts great.  
For the other ½ cup gf flours I have used ¼ tapioca and ¼ cup sorghum, or  brown rice and potato starch, or millet.  
I have also doubled the chia and pysillium husk with good results. 
For a round pumpernickel loaf I have added a bit of cocoa powder to give it a nice dark colour and then let it rise in a round pan to give it the traditional shape - great for use with spinach dip.

Cool  loaves a little and remove from pan.   We slice the bread and eat it fresh for lunch.  The remaining bread is sliced when cold and then frozen.  You can either defrost and eat it or if you want it more like fresh, just zap in the microwave until quite warm.  You can then make sandwiches without toasting the bread.

Thursday, April 25, 2013

Gluten Free - Dairy Free Carrot Muffins. Delicious, Soft and Moist!

I am pretty excited about our new gluten free/dairy free carrot muffins.  I like my gluten free muffins light, slightly moist and well to be honest - I want my muffins to taste like "normal" muffins - like the kind I turned out before we went gluten free.
The carrot muffins are very good and keep well.  You may keep them in a sealed plastic container or bag on the counter for a few days or freeze and defrost when needed. They retain their moistness and character.
Gluten Free-Dairy Free Carrot Muffins -  Makes 24
1 1/2 cups cornstarch
1/2 cup tapioca starch
1/4 cup sweet rice flour
1/4 cup teff flour
1/3 cup flax meal
1 teaspoon chia seed meal
2 teaspoons physillium powder or husk
2 1/2 teaspoons guar gum
3 teaspoons baking powder
1/2 teaspoon baking soda
1 teaspoon cinnamon
1/2 teaspoon allspice
1/2 teaspoon nutmeg
1/2 teaspoon salt
1 cup applesauce
1 cup Rogers golden syrup, corn syrup or honey ( I use Rogers Golden Syrup)
1 cup cooking oil (I use Canola)
4 eggs
1 teaspoon vanilla extract
1 cup finely grated carrot (they should be cooked a bit. I cook mine in the microwave with a tablespoon of water to steam for about one minute on high.  Cool before using.
Place dry ingredients into a large mixing bowl.  Wisk together really well.  Make a well in center of dry mixture.  In another bowl stir together the wet ingredients and pour into well in dry ingredients.  Using a hand mixer mix until combined.  Place muffin papers into muffin pan.  Fill 24 muffin cups.  Bake at 350 for 15-20 minutes or until done.


Wednesday, April 24, 2013

Gluten Free Danish Pastry

 I dream about recipes - gluten free recipes to be exact.  I'm not sure why except I am always thinking of ways to make gluten free foods similar to what wheat flour foods taste and "feel" like. This was one recipe I developed partly in my dreams and partly as I lay half awake thinking about how it would work.  I'm really happy with the way they turned out. They had puffed up nicely much like a simple puff pastry. I find they are best made with the full fat cottage cheese. 
Gluten Free Danish Pastry
8 ounces butter (let sit out on counter for awhile so it is not rock hard)
8 ounces 2%  or full fat cottage cheese
2 1/4 cup gluten free flour mix (shown below)
2 teaspoons guar gum
1 teaspoon physillium powder or husk
Gluten Free Flour Mix
2 cups sweet rice flour
2/3 cup pototo starch
1/3 cup tapioca starch
Method:
Combine butter and cottage cheese in food processer using blade.  Process until smooth.  Add the 2 1/4 cups of the flour mix, the guar gum and physillium powder.  Mix very well, until smooth  (dough will keep in fridge for 2 days)
Form into 18 equal sized balls and flatten each ball into a 3" circle and place on parchment lined baking sheets.  Bake in a preheated 375 degree oven for 10-12 minutes until edges are golden.  Remove and immediately spread with about 2 teaspoons jam in centers.  Cool on racks.  Drizzle with a glaze (1 egg white mixed with 1 cup icing sugar mix well.  Should be of drizzle consistency).
About 1 cup jam fills 18. 
I also like this Danish Pastry to using in gluten free Samosas.

Friday, September 30, 2011

Mock Pumpernickel - In the Slow Cooker~gluten free

Often I hear that Celiac's lament that most gf breads have very little fibre.  This bread should take care of that!  This is a very dense bread that you slice into very thin slices.
Tastes just like old fashioned dark rye pumpernickel!
I will include changes at the end if you wish to use cooked rice instead of buckwheat groats.
Ingredients

1 cup buckwheat groats
3/4 cup cornmeal
2 cups boiling water
Mix together, cover and soak overnight

3/4 cup plus 9 tablespoons brown rice flour (can use white)
1/4 cup yellow corn flour (not corn meal)(or other gf flour)
1/2 teaspoon salt
1 1/2 teaspoon baking soda
2 tablespoons corn syrup or molasses
1 tablespoon cooking oil
Stir together the dry ingredients. In a small dish mix the syrup and oil.
Mix all the ingredients into the cooled buckwheat/cornmeal water mixture that has soaked overnight. Mix well with a spoon.
Grease a 9" x 5" loaf pan. Line the bottom with greased foil.
Put dough into pan. Cover pan tightly with foil.
Place in large oblong slowcooker. Cover. Cook on High for 6 hours.
Cool. Remove from loaf pan. Place in plastic bag in fridge overnight.
Slice into 1/4" slices with a greased knife.  Slice and freeze.
If you have a round slow cooker- use a round metal pan that fits inside.
Changes for "Mock Rice Pumpernickel"
Substitute :
  • 1 cup cooked brown rice for the buckwheat. Soak One Hour instead of overnight.
  • Add 1/2 teaspoon guar gum and 2 tablespoons cocoa powder to the dry ingredients.
  • Use cornstarch instead of cornflour


Let cool completely.  Store in plastic bag.  Slice thin.

Barb's Green Relish

Neighbor Barb also gave me her great recipe for Green Relish.  The first time I made it I was suprised that it didn't look like store bought relish although it tasted like it.  I had some food colour in the pantry that I had purchased for adding to the kids homemade playdoh and luckily it was green. This was many years ago when I had young kids and everyone I knew made their own playdoh instead of buying it...... I added just a tiny bit and stirred it through.  It looked great - just like store bought.  I want to make this recipe again but the last two years we did not put in a garden.  My son and daughter-in-law have a large garden and are harvesting lots of cucumbers.  That is why I dug out these two recipes.  They gave me enough cukes to make dills, but I will have to hint that I would like enough to make a few jars of relish too.
Barb's Green Relish -makes 4 quarts
Ingredients:
10 4" cucumbers (they are just the dills grown too big)- about 1.5 kg
4 medium onions - 900 grams or 2 lbs
400 grams or 14 oz celery
2 red peppers- 1/2 lb or 225 grams
2 green peppers- 1/2 lb or 225 grams
1/4 cup pickling salt (coarse salt)
Put the vegetables through a food processor with blade or use coarse  shredder.  Place in large glass bowl or stainless steel pan.  Sprinkle the pick
ling salt over and put the lid on.
Let sit for 6-8 hours.
Drain well.
Sauce:
In large pot place:
3 cups white sugar
3 cups vinegar
1/2 teaspoon tumeric
1 teaspoon celery seed
1 teaspoon mustard seed
Bring to a boil.  Add vegetables.  Simmer uncovered 30 minutes, stirring occassionally.  This is where you will add the tiny bit of green food colour if you choose.  Seal in clean hot canning (pint) jars.  Place in a boiling water bath for 10 minutes.
Boiling water bath.  Put enough water into your canner that it will cover the jars.  Bring to a boil.  Place the jars into the canner.  Cover and boil for 10 minutes.  Remove jars and place on a towel placed on the counter.  Let cool.  You will hear the delightful "pings" as each jar seals.  If a jar does not seal - do not worry.  Just place it in the fridge to use first.

Barb's Dill Pickles

We have lovely neighbors.  We've been next to each other for 33 years.  When I started gardening and grew pickling cukes- or maybe it's when Barb gave me a bag from her garden - she also gave me her recipe.  Every so often I phone her up and ask once again "do you put these in a boiling water bath?  Or just let the hot jars seal on their own".  After 33 years, I called once again and finally this time wrote it on the recipe card "No Water Bath".  I remember reading all about canning online a few years ago and then everyone was saying you had to put your quarts in a water bath.  The resulting pickles were not nearly as good and crunchy - the way I love them. 
Prepare 2 quart jars by washing them and boiling them or putting them through the dishwasher.  I do the dishwasher method once we moved up to owning one!  The idea is to time the washing of the jars so that they come straight from the dishwasher to the counter to be filled with cucumbers.  Let's back up a bit here..... first the recipe:
Barb's Dill Pickles:
In each hot clean quart jar put: 1 teaspoon pickling spice.
                                               1/4 teaspoon powdered alum
                                               1 clove garlic, peeled.
Fill the jar with scrubbed clean, small pickling cukes.  Right up to the shoulder of the jar. Place one head of dill at the top of the the cukes. 
Liquid:
 in pan on stove put:
3 cups water
1 cup white vinegar
1/4 cup pickling salt (coarse salt or un-iodized salt)
Bring to a boil and pour over cukes in jars.  There is enough liquid to fill two jars.  Place clean hot snap lid on top and screw on lid.  Let cool on counter.  You should hear two snaps indicating both jars have sealed.  Barb had told me not to double the recipe.  Many times I didn't listen thinking "what difference can that make?"  Well, I should listen and so should you if you try this recipe. The pickles turn out way better if you just make two jars at a time.  Let sit for at least a month in you basement cold storage room for the flavour to develope.
Tips: Clean your cucumbers first.  Assemble all your ingredients and supplies next.  Put your jars in the dishwasher, boil the lids and boil the liquid. 

Sunday, September 18, 2011

Overnight Rotini Casserole ~ Easty to convert to gluten free

As mentioned before, we usually have a full house on Sunday's for lunch.  This is a great make ahead recipe!
The recipe calls for Rotini pasta which is the spiral pasta.  To make the recipe gluten free susbstitute with gluten free macaroni rice noodles - it worked great and we all ate the same casserole without anyone noticing it was gluten free.
Ingredients:
1 1/2 lbs lean ground beef                  
1 cups diced onion
1 cup diced green pepper
2 cloves garlic, minced
1 28 ounce can crushed tomatoes
2 cups hot water
1 envelope onion soup mix (for gluten free please read ingredients and choose a gluten free one)
1 teaspoon italian seasoning (I used 3/4 tsp. oregano and 1/4 tsp. thyme)
3 cups uncooked rotini pasta (or gluten free macaroni rice noodles)
1 1/2 cups shredded mozzarella
Method:
Oil or butter a 9"X 13" glass casserole dish.  In a pot, fry the hamburger, onion, pepper and garlic on medium heat until hamburger is brown - stirring frequently.  If there is any grease - drain.
Stir in the crushed tomatoes, water , onion soup mix and seasonings.  Stir in the pasta and spoon into the prepared casserole dish.
Cover with aluminum foil and refredigerate 8 hours and no more than 24 hours.
Bake at 350 for 1 hour.  Remove foil, sprinkle on shredded cheese and return to oven for 10 minutes until the cheese is melted.
Serves 8 -10
Serve with salad, sliced veggies, and or buns.

I made this one with rice macaroni noodles from our local chinese store.